Senin, 14 Januari 2013

Emoticons For Facebook Yahoo And Skype

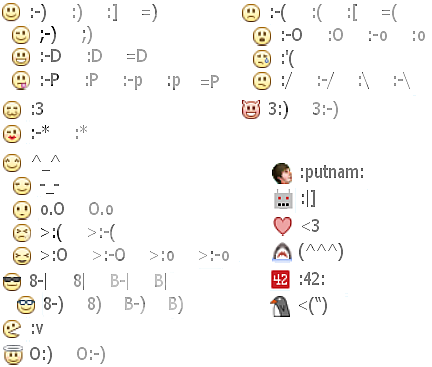
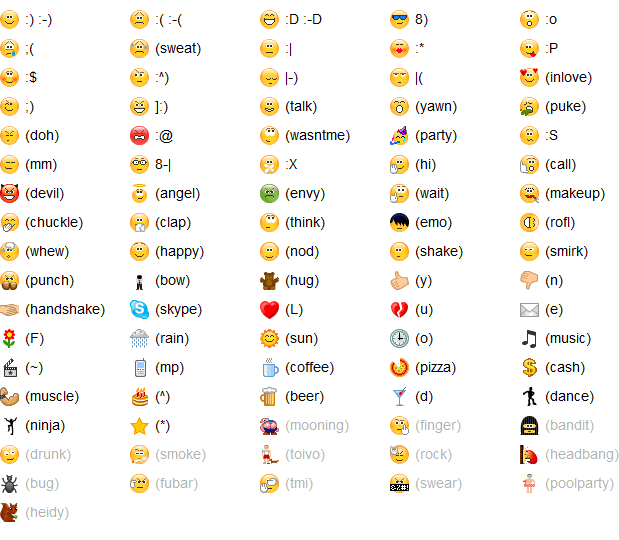
Emotions represents feeling right? Everyone in this world use feeling for different marks. Therefore there are many types of emotion which people use to communicate their feelings with each other. Emotions say happy,loving, sad, romantic,evil, disappointed, excited and angry feelings are more common. Now if i say that emotion is the best way to say something without saying then i will not be wrong. right?
A person who cannot talk, he can tell something via emotions. In this world million of peoples are connected with each other through social networking so thats why in social networks we can’t write to much and hence we use short spelling and smileys to tell our emotions. Smiles are used in Facebook, Skype, msn, hotmail or window live messenger, Yahoo and etc. So this article is about Smilies and Emoticons and this post contains a huge collection of Smilies and Emoticons.

Don't forget to like us on Facebook. Leave your comment and stay connected with us.


Emoticons-smileys

Emoticons-smileys

Emoticons-smileys

Emoticons-smileys

Emoticons-smileys

Emoticons-smileys

Emoticons-smileys

Emoticons-smileys


Emoticons-smileys

Emoticons-smileys

Emoticons-smileys

Emoticons-smileys

Emoticons-smileys

Emoticons-smileys

Emoticons-smileys

Emoticons-smileys

Emoticons-smileys

Emoticons-smileys

Emoticons-smileys

Emoticons-smileys

Emoticons-smileys

Emoticons-smileys

Emoticons-smileys


Sabtu, 12 Januari 2013

Vertical Floating Social Sharing Bar Widget


You have seen that the trend of floating sharing count buttons on popular blogs websites. As you know the traditional icons are now replaced with auto counter buttons that are updated in seconds. I created totaly different version of this bar, applying both jQuery effects and CSS 3 styles. But this widget is so many times different because it contains custom facebook, google+, twitter, pinterest and an Email button.  Vertical floating social sharing bar is one of the best blogger new widgets, because you can notice the increasing trend of social sharing widgets.This version is the upgraded version than previous versions.So in this widget you will get facebook like button,twitter tweet button, pinterest pin it button, google +1 button, addthis sharing button and print button. The installation of this widget is simple so that you can easily implement it into your blog. 


The steps are extremely easy to apply to your blog/blogger. All you need is to copy and paste the codes. Follow these friendly steps:


1. First Go to Blogger Dashboard > Template
2. Download a copy of your template
3. Click Edit HTML
4. Hit Proceed button
5. Check Expand Widget Templates checkbox
6. Find for below code in your template,


<b:includable id='post' var='post'>
7. Just below it paste the following code:

<b:if cond='data:blog.pageType == &quot;item&quot;'> 
<b:if cond='data:blog.pageType != &quot;static_page&quot;'> 
<style> 
.mbt_social_floating{ 
    position:fixed; bottom:10%; margin-left:-60px; float:left;     width:60px; 
    background-color:#f7f7f7;     padding: 5px 0 0px 0px; 
     border-top:1px solid #ddd; 
border-left:1px solid #ddd; 
border-bottom:1px solid #ddd; 
z-index:9999px !important; 
border-radius:5px;-moz-border-radius:5px;-webkit-border-radius:5px; 
} 
.mbt_social_floating .mbt_side_social_button{ 
    margin-bottom:5px; 
    float:none; 
    height:auto; 
    width:60px; 
} 
.mbt_social_floating .st_twitter_vcount, .mbt_social_floating.st_plusone_vcount, .st_email{ 
    margin-left:5px; 
} 
.mbt_social_floating .st_fblike_vcount{ 
    margin-left:5px; 
} 
.mbt_social_floating .stButton_gradient{ 
    background:none !important; 
    height:21px !important; 
    padding-left:0 !important; 
} 
.mbt_social_floating .chicklets, .mbt_social_floating .stMainServices { 
    background:url(&#39;https://blogger.googleusercontent.com/img/b/R29vZ2xl/AVvXsEjy8FBBZRz52QCDxgYniuaGgd8tSXolC-OFD1U7QaJ93r3nrI4BuprXj91rJCYlCdN9RGJSCf9IMhkKxm7gVsGxZEEjNhegl_kSjDG6vOUHkxPh7atX4yaU_VKp_TIRezvoHZ6r40qO4E9t/s400/gc_social_sprite.gif&#39;) no-repeat !important; 
    height:19px !important; 
    width:45px !important; 
    padding:0 !important; 
} 
.st_email .chicklets{ 
    background-position:0 -77px !important; 
    background-image:url(&#39;https://blogger.googleusercontent.com/img/b/R29vZ2xl/AVvXsEjy8FBBZRz52QCDxgYniuaGgd8tSXolC-OFD1U7QaJ93r3nrI4BuprXj91rJCYlCdN9RGJSCf9IMhkKxm7gVsGxZEEjNhegl_kSjDG6vOUHkxPh7atX4yaU_VKp_TIRezvoHZ6r40qO4E9t/s400/gc_social_sprite.gif&#39;) !important; 
} 
.mbt_social_floating .st_twitter_vcount .st-twitter-counter{ 
    background-position:0 -58px !important; 
} 
.mbt_social_floating  .stButton_gradient{ 
    border:none !important; 
} 
.mbt_social_floating .stBubble_count{ 
    width:44px !important; 
    font-size: 15px !important; 
    font-weight: normal !important; 
    padding-top:7px !important; 
    height:23px !important; 
    background:none !important; 
} 
.mbt_social_floating .st_twitter_vcount .stBubble_count{ 
    color:#00a6df; 
    background-color:#f8fbfc !important; 
} 

.st_fblike_vcount{ 
    margin-bottom: 0px; 
    display: block; 
} 
.st_twitter_vcount{ 
    margin-bottom: 3px; 
    display: block; 
} 

.st_email{ 
    margin-bottom: 5px; margin-top: 3px; 
    display: block; 
} 
.mbt_social_floating .stBubble{ 
    background-position: 21px 31px !important; 
    height:35px !important; 
}.mbt_social_floating .st_pinterest_vcount{
    margin-left:5px;
}
.mbt_social_floating .st_pinterest_vcount .st-pinterest-counter{
    background-position:0 -19px !important;
}
.mbt_social_floating .st_pinterest_vcount .stBubble_count{
    color:#FF0505;
    background-color:#fbf8f8 !important; 
}

.mbt_social_floating .st_pinterest_vcount .stBubble{
    background-image:url('https://blogger.googleusercontent.com/img/b/R29vZ2xl/AVvXsEjjc8HHqydqOG0vuPYvBAFpR98lQv3XIOuAKfGG24pgtas-_s1cm42jDqEVaSijiAiRGpV2EdcNz5jNALbXQSJ5HaFB9sh_pi86pfApqSvZfRVQ_1kYExZ6t0DkivGfABAqJd8BrWRuyHgD/s400/bubble_arrow_pinterest.png') !important;
}


.st_pinterest_vcount{
    margin-bottom: 0px;
    display: block;
}

</style> 

<div class='mbt_social_floating'> 
    <script type='text/javascript'>var switchTo5x=true;</script> 
    <script src='http://w.sharethis.com/button/buttons.js' type='text/javascript'/> 
    <script type='text/javascript'>stLight.options({onhover:false});</script> 
    <span class='st_fblike_vcount' displaytext=''/> 
    <span class='st_twitter_vcount' displaytext='' st_via='crackmodo'/> 
<span class='st_pinterest_vcount' displaytext=''/>
<div style='margin:0px 0 0 5px;'> 
    <span class='st_plusone_vcount' displaytext=''/> 
</div> 
    
<div class='addthis_toolbox addthis_default_style ' style='margin:5px 0px 5px 8px;'> 
<a class='addthis_counter'/> 
</div> 
<script src='http://s7.addthis.com/js/250/addthis_widget.js' type='text/javascript'/> 
<script type='text/javascript'> 
var addthis_config = { 
     ui_cobrand: &quot;MY BLOGGER TRICKS&quot;, 
ui_header_color: &quot;#ffffff&quot;, 
     ui_header_background: &quot;#0080FF&quot; 
} 
</script> 
<span class='st_email' displaytext=''/> 
<p style=' line-height:0px; font-size:10px; font-weight:bold; text-align:center;'><a href='http://crackmodo.blogspot.com/2013/01/vertical-social-widget.html' style='color:#CAC8C8;'>Widgets</a></p> 
</div> 
</b:if></b:if>


8. Now replace CrackModo with your twitter username.

Now save the template and you are done.

Stunning Magazine Style Blogger Template

                                                                LIVE DEMO | DOWNLOAD

It's been quite a while since I have released any new blogger template, because of my studies etc. But, Here I am again back with another Stunningly looking Magazine Style Blogger Template.."Novinture".

I have did so many blogger templates sofar, but for me this one is the best of all.. It looks very professional and  with an amazing slideshow feature.

Here are some of the features :

  • Top Nav links
  • Stunning Slideshow
  • Retweet button
  • Facebook Share button
  • 4 Column footer
  • Email Subscriptions
  • Feed Counter
  • Built in Search Box
  • Wonderful Comment section (with avatars)
  • Most Wanted feature.. Page Navigation Enabled
  • Automatic Thumbnails on homepage
  • Automatic Post summaries on homepage
  • Advertisement banner ready (on header)
  • many more.....

Related Articles:


Facebook Like Box At Bottom Of The Post

Facebook like box is a fantastic plugin that lets Facebook users to indirectly subscribe to your blog updates via their Facebook accounts. Your website visitors will receive your blog updates on their Facebook Homepage. Before you add the Facebook like box below blogger posts or on any part of your blog, you will need to create a Facebook Like Page. If you have Facebook Page then follow these steps:
  1. Go To Blogger > Design > Edit HTML
  2. Backup your template
  3. Check the "Expand widget Templates" box
  4. Search for this,
<data:post.body/>
Just after it paste the code below,
<iframe allowTransparency='true' frameborder='0' scrolling='no' src='http://www.facebook.com/plugins/likebox.php?href=http%3A%2F%2Fwww.facebook.com%2Fpages%2FMy-Blogger-Tricks%2F147104632016744&amp;width=590&amp;colorscheme=light&amp; show_faces=true&amp;stream=false&amp;header=false&amp;height=180' style='border:none; overflow:hidden; width:590px; height:180px;'/>
Make this change please:
  • Replace the bolded blue text with your Facebook Like Page Link (Do not include http://)
  • In your Page URL replace all back slashes i.e ( / ) with %2F
for example if your Like Page URL looks like this,

then after replacing the back slashes with %2F it will look like this,

www.facebook.com%2Fpages%2FMy-Blogger-Tricks%2F147104632016744
  •     To change the width, just adjust the value 590
  • 5.   Save your template and you are done!
If you find any problem then comment us, we will respond you quickly.


Multi Column Footer Widget For Blogger

This widget can become three column, four column or with as many columns as you wish. Further this new footer widget has some great CSS effects added to it which makes it even better. So first you will have to add the CSS code to your blogger templates and then the HTML.

  1. Go To Blogger > Design > Edit HTML
  2. Backup Your Template
  3. Search for ]]></b:skin>
  4. Just above ]]></b:skin> paste the code below,
              /*----- MULTI COLUMN FOOTER WIDGET -----*/
#lower {
margin:auto;
padding: 0px 0px 10px 0px;
width: 100%;
background:#333333;
}
#lower-wrapper {
background:#333333;
margin:auto;
padding: 20px 0px 20px 0px;
width: 960px;
border:0;
}
#lowerbar-wrapper {
background:#333333;
float: left;
margin: 0px 5px auto;
padding-bottom: 20px;
width: 23%;
text-align: justify;
color:#ddd;
font: bold 12px Arial, Tahoma, Verdana;
line-height: 1.6em;
word-wrap: break-word;
overflow: hidden;
}
.lowerbar {margin: 0; padding: 0;}
.lowerbar .widget {margin: 0; padding: 10px 20px 0px 20px;}
.lowerbar h2 {
margin: 0px 0px 10px 0px;
padding: 3px 0px 3px 0px;
text-align: left;
border:0;
color:#ddd;
text-transform:uppercase;
font: bold 14px Arial, Tahoma, Verdana;
}
.lowerbar ul {
color:#fff;
margin: 0 auto;
padding: 0;
list-style-type: none;
}
.lowerbar li {
display:block;
color:#fff;
line-height: 1.6em;
margin-left: 0 !important;
padding: 6px;
border-bottom: 1px solid #222;
border-top: 1px solid #444;
list-style-type: none;
}
.lowerbar li a {
text-decoration:none; color: #DBDBDB;
}
.lowerbar li a:hover {
text-decoration:underline;
}
.lowerbar li:hover {
display:block;
background: #222;
}

       5.    Now search for </body> and paste the following code just above </body>

<div id='lower'>
<div id='lower-wrapper'>

<div id='lowerbar-wrapper'>
<b:section class='lowerbar' id='lowerbar1' preferred='yes'>
</b:section>
</div>

<div id='lowerbar-wrapper'>
<b:section class='lowerbar' id='lowerbar2' preferred='yes'>
</b:section>
</div>

<div id='lowerbar-wrapper'>
<b:section class='lowerbar' id='lowerbar3' preferred='yes'>
</b:section>
</div>

<div id='lowerbar-wrapper'>
<b:section class='lowerbar' id='lowerbar4' preferred='yes'>
</b:section>
</div>

<div style='clear: both;'/>
</div> </div>
      6.   Save your template and you are done!
Now go to Layout and add your widgets to the newly added Footer Widget that will look like this,


You can see that there is a total of four columns by default and you can add as many widgets as you want to each column. If you wish to increase or decrease the number of vertical columns then follow the steps below.

How to customized the widget:


Well I will keep it simple. The only thing that you will need to adjust according to your template is the width of the widget and the number of vertical columns.
1.  In order to reduce or increase the overall width of the widget simply change width: 960px;
2.  If you wish to decrease the number of widgets to three then simply delete this part of the code,
<div id='lowerbar-wrapper'>
<b:section class='lowerbar' id='lowerbar4' preferred='yes'>
</b:section>
</div>
3.  Or if you wish to add an extra column then add the code below just above <div style='clear: both;'/>
<div id='lowerbar-wrapper'>
<b:section class='lowerbar' id='lowerbar#' preferred='yes'>
</b:section>
</div>
Remember that lowerbar# refers to the column number. So if you want to add a fifth column then simply replace  lowerbar# with lowerbar5.
After you have added the fifth column then remember to change width: 23%; withwidth: 17%;

You will repeat step 3 for as many columns as you wish to create. But three and four and five columns are a standard. Increasing them will make things look ugly so i suggest don't do this.